通过NDK实现Zxing二维码扫描放大功能
在各个APP中几乎都能看见它的身影。二维码扫描虽然是一个普通的功能,但是在APP中占依然都放在很抢眼的位置。比如像淘宝、58这类APP主要解决PC端扫码登录,微信、支付宝这类主要使用支付,摩拜小蓝这类APP主要是用于扫码骑车。所以,能更快捷更方便的使用二维码,可以极大的提升用户体验。
##快捷与方便
曾经或许会有那么一个寒冷的夜晚,你骑着刚共享单车飞驰在回家的路上,突然,街边飘来哈尔滨烤冷面的香气让你不知不觉的来到那个小摊面前,迟疑了很久,你说了一句:“老板,来一份。。。再。。。加个肠。”昏暗的灯光下、其他的食客中,老板熟练的抄起手中的家伙,你熟练掏出手机,打开扫一扫,老板的二维码在你的手里一次次对焦、一次次放大,“滴”的一声,付钱,取餐,嗝~。
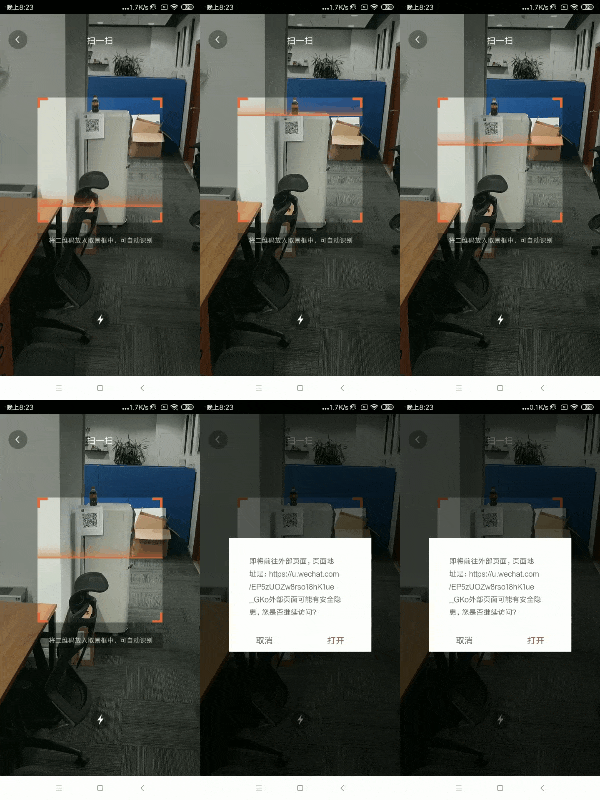
你有没有想过,为什么在扫描的过程中,被扫描的二维码会在扫描框里从模糊到清晰,然后再从清晰到模糊,周而复始?
你有没有想过,为什么在稍远的距离,二维码扫描就会慢慢放大?
是的,在这个寒冷的夜,为了能让你的手机更快速的识别出对方的二维码,我们做了很多。
##二维码解读
我们来看一下二维码扫描主要展示信息,主要分为功能图形和编码区格式。其中功能图形的位置探测图形、定位图形、矫正图形在定位的过程中起着举足轻重的地位。

##二维码扫描的源码解读
从你拿出手机对准二维码直到扫描结束,整个过程都发生了什么?为了能让你生动的了解整个过程,我打算用下面的方式讲:
打开相机执行扫描->获取Byte流->灰度->二值化->霍夫变换->找到二维码定位点->识别->返回结果。
###打开相机执行扫描
private void initCamera(SurfaceHolder surfaceHolder) {
        if (surfaceHolder == null) {
            throw new IllegalStateException("No SurfaceHolder provided");
        }
        if (cameraManager.isOpen()) {
            Log.w(TAG, "initCamera() while already open -- late SurfaceView callback?");
            return;
        }
        try {
            cameraManager.openDriver(surfaceHolder);
            // Creating the handler starts the preview, which can also throw a
            // RuntimeException.
            if (handler == null) {
                handler = new CaptureActivityHandler(this, cameraManager, DecodeThread.ALL_MODE);
            }

            initCrop();
        } catch (IOException ioe) {
            Log.w(TAG, ioe);
            displayFrameworkBugMessageAndExit();
        } catch (RuntimeException e) {
            // Barcode Scanner has seen crashes in the wild of this variety:
            // java.?lang.?RuntimeException: Fail to connect to camera service
            Log.w(TAG, "Unexpected error initializing camera", e);
            displayFrameworkBugMessageAndExit();
        }
    }
###设置支持的二维码类型
目前二维码支持如下类型:

代码在这里配置:
// The prefs can't change while the thread is running, so pick them up once here.
    if (decodeFormats == null || decodeFormats.isEmpty()) {
      SharedPreferences prefs = PreferenceManager.getDefaultSharedPreferences(activity);
      decodeFormats = EnumSet.noneOf(BarcodeFormat.class);
      if (prefs.getBoolean(PreferencesActivity.KEY_DECODE_1D_PRODUCT, true)) {
        decodeFormats.addAll(DecodeFormatManager.PRODUCT_FORMATS);
      }
      if (prefs.getBoolean(PreferencesActivity.KEY_DECODE_1D_INDUSTRIAL, true)) {
        decodeFormats.addAll(DecodeFormatManager.INDUSTRIAL_FORMATS);
      }
      if (prefs.getBoolean(PreferencesActivity.KEY_DECODE_QR, true)) {
        decodeFormats.addAll(DecodeFormatManager.QR_CODE_FORMATS);
      }
      if (prefs.getBoolean(PreferencesActivity.KEY_DECODE_DATA_MATRIX, true)) {
        decodeFormats.addAll(DecodeFormatManager.DATA_MATRIX_FORMATS);
      }
      if (prefs.getBoolean(PreferencesActivity.KEY_DECODE_AZTEC, false)) {
        decodeFormats.addAll(DecodeFormatManager.AZTEC_FORMATS);
      }
      if (prefs.getBoolean(PreferencesActivity.KEY_DECODE_PDF417, false)) {
        decodeFormats.addAll(DecodeFormatManager.PDF417_FORMATS);
      }
    }
    hints.put(DecodeHintType.POSSIBLE_FORMATS, decodeFormats);
###获取相机预览的Byte流
public class PreviewCallback implements Camera.PreviewCallback {

	private static final String TAG = PreviewCallback.class.getSimpleName();

	private final CameraConfigurationManager configManager;
	private Handler previewHandler;
	private int previewMessage;

	public PreviewCallback(CameraConfigurationManager configManager) {
		this.configManager = configManager;
	}

	public void setHandler(Handler previewHandler, int previewMessage) {
		this.previewHandler = previewHandler;
		this.previewMessage = previewMessage;
	}

	@Override
	public void onPreviewFrame(byte[] data, Camera camera) {
		Point cameraResolution = configManager.getCameraResolution();
		Handler thePreviewHandler = previewHandler;
		if (cameraResolution != null && thePreviewHandler != null) {
			Message message = thePreviewHandler.obtainMessage(previewMessage, cameraResolution.x, cameraResolution.y, data);
			message.sendToTarget();
			previewHandler = null;
		} else {
			Log.d(TAG, "Got preview callback, but no handler or resolution available");
		}
	}

}

//在这里通过相机框获取bitmap的byte流
PlanarYUVLuminanceSource source = activity.getCameraManager().buildLuminanceSource(data, width, height);

BinaryBitmap bitmap = new BinaryBitmap(new HybridBinarizer(source));
###对bitmap的byte流解码
if (formats != null) {
  boolean addOneDReader =
	  formats.contains(BarcodeFormat.UPC_A) ||
	  formats.contains(BarcodeFormat.UPC_E) ||
	  formats.contains(BarcodeFormat.EAN_13) ||
	  formats.contains(BarcodeFormat.EAN_8) ||
	  formats.contains(BarcodeFormat.CODABAR) ||
	  formats.contains(BarcodeFormat.CODE_39) ||
	  formats.contains(BarcodeFormat.CODE_93) ||
	  formats.contains(BarcodeFormat.CODE_128) ||
	  formats.contains(BarcodeFormat.ITF) ||
	  formats.contains(BarcodeFormat.RSS_14) ||
	  formats.contains(BarcodeFormat.RSS_EXPANDED);
  // Put 1D readers upfront in "normal" mode
  readers.add(new MultiFormatOneDReader(hints));
  if (formats.contains(BarcodeFormat.QR_CODE)) {
	readers.add(new QRCodeReader(mActivity));
  }
  if (formats.contains(BarcodeFormat.DATA_MATRIX)) {
	readers.add(new DataMatrixReader());
  }
  if (formats.contains(BarcodeFormat.AZTEC)) {
	readers.add(new AztecReader());
  }
  if (formats.contains(BarcodeFormat.PDF_417)) {
	 readers.add(new PDF417Reader());
  }
  if (formats.contains(BarcodeFormat.MAXICODE)) {
	 readers.add(new MaxiCodeReader());
  }
  // At end in "try harder" mode
  readers.add(new MultiFormatOneDReader(hints));
解码,调用接口的实现类
private Result decodeInternal(BinaryBitmap image) throws NotFoundException {
    if (readers != null) {
      for (Reader reader : readers) {
        try {
          return reader.decode(image, hints);
        } catch (ReaderException re) {
          // continue
        }
      }
    }
    throw NotFoundException.getNotFoundInstance();
  }
// QRCodeReader.java
	@Override
	  public final Result decode(BinaryBitmap image, Map<DecodeHintType,?> hints)
		  throws NotFoundException, ChecksumException, FormatException {
		DecoderResult decoderResult; //解析结果
		ResultPoint[] points; //解析的点
		if (hints != null && hints.containsKey(DecodeHintType.PURE_BARCODE)) {
		  //二值化:image.getBlackMatrix()
		  BitMatrix bits = extractPureBits(image.getBlackMatrix());
		  decoderResult = decoder.decode(bits, hints);
		  points = NO_POINTS;
		} else {
		  //二值化:image.getBlackMatrix()
		  DetectorResult detectorResult = new Detector(image.getBlackMatrix()).detect(hints);
		  decoderResult = decoder.decode(detectorResult.getBits(), hints);
		  points = detectorResult.getPoints();
		}

		// If the code was mirrored: swap the bottom-left and the top-right points.
		if (decoderResult.getOther() instanceof QRCodeDecoderMetaData) {
		  ((QRCodeDecoderMetaData) decoderResult.getOther()).applyMirroredCorrection(points);
		}

		Result result = new Result(decoderResult.getText(), decoderResult.getRawBytes(), points, BarcodeFormat.QR_CODE);
		List<byte[]> byteSegments = decoderResult.getByteSegments();
		if (byteSegments != null) {
		  result.putMetadata(ResultMetadataType.BYTE_SEGMENTS, byteSegments);
		}
		String ecLevel = decoderResult.getECLevel();
		if (ecLevel != null) {
		  result.putMetadata(ResultMetadataType.ERROR_CORRECTION_LEVEL, ecLevel);
		}
		if (decoderResult.hasStructuredAppend()) {
		  result.putMetadata(ResultMetadataType.STRUCTURED_APPEND_SEQUENCE,
							 decoderResult.getStructuredAppendSequenceNumber());
		  result.putMetadata(ResultMetadataType.STRUCTURED_APPEND_PARITY,
							 decoderResult.getStructuredAppendParity());
		}
		return result;
	  }


	/**
	   * <p>Detects a QR Code in an image.</p>
	   *
	   * @param hints optional hints to detector
	   * @return {@link DetectorResult} encapsulating results of detecting a QR Code
	   * @throws NotFoundException if QR Code cannot be found
	   * @throws FormatException if a QR Code cannot be decoded
	   */
	  public final DetectorResult detect(Map<DecodeHintType,?> hints) throws NotFoundException, FormatException {

		resultPointCallback = hints == null ? null :
			(ResultPointCallback) hints.get(DecodeHintType.NEED_RESULT_POINT_CALLBACK);

		FinderPatternFinder finder = new FinderPatternFinder(image, resultPointCallback);
		FinderPatternInfo info = finder.find(hints);

		return processFinderPatternInfo(info);
	  }
###定位特征点
	final FinderPatternInfo find(Map<DecodeHintType,?> hints) throws NotFoundException {
		boolean tryHarder = hints != null && hints.containsKey(DecodeHintType.TRY_HARDER);
		int maxI = image.getHeight();
		int maxJ = image.getWidth();
		int iSkip = (3 * maxI) / (4 * MAX_MODULES);
		if (iSkip < MIN_SKIP || tryHarder) {
		  iSkip = MIN_SKIP;
		}

		boolean done = false;
		int[] stateCount = new int[5];
		for (int i = iSkip - 1; i < maxI && !done; i += iSkip) {
		  // Get a row of black/white values
		  clearCounts(stateCount);
		  int currentState = 0;
		  for (int j = 0; j < maxJ; j++) {
			if (image.get(j, i)) {
			  // Black pixel
			  if ((currentState & 1) == 1) { // Counting white pixels
				currentState++;
			  }
			  stateCount[currentState]++;
			} else { // White pixel
			  if ((currentState & 1) == 0) { // Counting black pixels
				if (currentState == 4) { // A winner?
				  if (foundPatternCross(stateCount)) { // Yes
					boolean confirmed = handlePossibleCenter(stateCount, i, j);
					if (confirmed) {
					  iSkip = 2;
					  if (hasSkipped) {
						done = haveMultiplyConfirmedCenters();
					  } else {
						int rowSkip = findRowSkip();
						if (rowSkip > stateCount[2]) {
						  i += rowSkip - stateCount[2] - iSkip;
						  j = maxJ - 1;
						}
					  }
					} else {
					  shiftCounts2(stateCount);
					  currentState = 3;
					  continue;
					}
					// Clear state to start looking again
					currentState = 0;
					clearCounts(stateCount);
				  } else { // No, shift counts back by two
					shiftCounts2(stateCount);
					currentState = 3;
				  }
				} else {
				  stateCount[++currentState]++;
				}
			  } else { // Counting white pixels
				stateCount[currentState]++;
			  }
			}
		  }
		  if (foundPatternCross(stateCount)) {
			boolean confirmed = handlePossibleCenter(stateCount, i, maxJ);
			if (confirmed) {
			  iSkip = stateCount[0];
			  if (hasSkipped) {
				// Found a third one
				done = haveMultiplyConfirmedCenters();
			  }
			}
		  }
		}
	//找到定位点
		FinderPattern[] patternInfo = selectBestPatterns();
		ResultPoint.orderBestPatterns(patternInfo);

		return new FinderPatternInfo(patternInfo);
	  }

	private static ResultPoint[] expandSquare(ResultPoint[] cornerPoints, float oldSide, float newSide) {
		float ratio = newSide / (2 * oldSide);
		float dx = cornerPoints[0].getX() - cornerPoints[2].getX();
		float dy = cornerPoints[0].getY() - cornerPoints[2].getY();
		float centerx = (cornerPoints[0].getX() + cornerPoints[2].getX()) / 2.0f;
		float centery = (cornerPoints[0].getY() + cornerPoints[2].getY()) / 2.0f;

		ResultPoint result0 = new ResultPoint(centerx + ratio * dx, centery + ratio * dy);
		ResultPoint result2 = new ResultPoint(centerx - ratio * dx, centery - ratio * dy);

		dx = cornerPoints[1].getX() - cornerPoints[3].getX();
		dy = cornerPoints[1].getY() - cornerPoints[3].getY();
		centerx = (cornerPoints[1].getX() + cornerPoints[3].getX()) / 2.0f;
		centery = (cornerPoints[1].getY() + cornerPoints[3].getY()) / 2.0f;
		ResultPoint result1 = new ResultPoint(centerx + ratio * dx, centery + ratio * dy);
		ResultPoint result3 = new ResultPoint(centerx - ratio * dx, centery - ratio * dy);

		return new ResultPoint[]{result0, result1, result2, result3};
	  }
###返回结果
	protected final DetectorResult processFinderPatternInfo(FinderPatternInfo info)
		  throws NotFoundException, FormatException {

		FinderPattern topLeft = info.getTopLeft();
		FinderPattern topRight = info.getTopRight();
		FinderPattern bottomLeft = info.getBottomLeft();

		float moduleSize = calculateModuleSize(topLeft, topRight, bottomLeft);
		if (moduleSize < 1.0f) {
		  throw NotFoundException.getNotFoundInstance();
		}
		int dimension = computeDimension(topLeft, topRight, bottomLeft, moduleSize);
		Version provisionalVersion = Version.getProvisionalVersionForDimension(dimension);
		int modulesBetweenFPCenters = provisionalVersion.getDimensionForVersion() - 7;

		AlignmentPattern alignmentPattern = null;
		// Anything above version 1 has an alignment pattern
		if (provisionalVersion.getAlignmentPatternCenters().length > 0) {

		  // Guess where a "bottom right" finder pattern would have been
		  float bottomRightX = topRight.getX() - topLeft.getX() + bottomLeft.getX();
		  float bottomRightY = topRight.getY() - topLeft.getY() + bottomLeft.getY();

		  // Estimate that alignment pattern is closer by 3 modules
		  // from "bottom right" to known top left location
		  float correctionToTopLeft = 1.0f - 3.0f / modulesBetweenFPCenters;
		  int estAlignmentX = (int) (topLeft.getX() + correctionToTopLeft * (bottomRightX - topLeft.getX()));
		  int estAlignmentY = (int) (topLeft.getY() + correctionToTopLeft * (bottomRightY - topLeft.getY()));

		  // Kind of arbitrary -- expand search radius before giving up
		  for (int i = 4; i <= 16; i <<= 1) {
			try {
			  alignmentPattern = findAlignmentInRegion(moduleSize,
				  estAlignmentX,
				  estAlignmentY,
				  i);
			  break;
			} catch (NotFoundException re) {
			  // try next round
			}
		  }
		}

		PerspectiveTransform transform =
			createTransform(topLeft, topRight, bottomLeft, alignmentPattern, dimension);

		BitMatrix bits = sampleGrid(image, transform, dimension);

		ResultPoint[] points;
		if (alignmentPattern == null) {
		  points = new ResultPoint[]{bottomLeft, topLeft, topRight};
		} else {
		  points = new ResultPoint[]{bottomLeft, topLeft, topRight, alignmentPattern};
		}
		return new DetectorResult(bits, points);
	  }
##问题来了
在阅读源码之后,我们发现这里面并没有解读放大相关的功能,这是为什么呢?
是的,因为Zxing库本来就没有提供放大的功能,那么我们想实现放大功能应该怎么做?
对,答案就是利用相机的放大功能setZoom来放大相机即可。
那么,什么时机放大呢?
###相机放大功能和二维码建立关系
为了解决这个放大时机的问题,我们再来回顾一下源码。
有这样一段源码,它的作用是找到定位点:
		FinderPattern[] patternInfo = selectBestPatterns();
		ResultPoint.orderBestPatterns(patternInfo);

		return new FinderPatternInfo(patternInfo);
	  }

	private static ResultPoint[] expandSquare(ResultPoint[] cornerPoints, float oldSide, float newSide) {
		float ratio = newSide / (2 * oldSide);
		float dx = cornerPoints[0].getX() - cornerPoints[2].getX();
		float dy = cornerPoints[0].getY() - cornerPoints[2].getY();
		float centerx = (cornerPoints[0].getX() + cornerPoints[2].getX()) / 2.0f;
		float centery = (cornerPoints[0].getY() + cornerPoints[2].getY()) / 2.0f;

		ResultPoint result0 = new ResultPoint(centerx + ratio * dx, centery + ratio * dy);
		ResultPoint result2 = new ResultPoint(centerx - ratio * dx, centery - ratio * dy);

		dx = cornerPoints[1].getX() - cornerPoints[3].getX();
		dy = cornerPoints[1].getY() - cornerPoints[3].getY();
		centerx = (cornerPoints[1].getX() + cornerPoints[3].getX()) / 2.0f;
		centery = (cornerPoints[1].getY() + cornerPoints[3].getY()) / 2.0f;
		ResultPoint result1 = new ResultPoint(centerx + ratio * dx, centery + ratio * dy);
		ResultPoint result3 = new ResultPoint(centerx - ratio * dx, centery - ratio * dy);

		return new ResultPoint[]{result0, result1, result2, result3};
那么,我们是不是利用这个定位点,就可以和相机扫描框的间距搞一些事情就可以了?
事实上,网上也有很多例子是这么做的。
行,既然已经有了,那我们直接拿来用就可以了吧?
NONONO,事情并不是那么简单:

##58APP二维码扫描的应用
因为58APP,用的不是Java实现的。核心解码流程使用的是C++,通过JNI编译生成的so,然后再打入到58APP里的。
兵来将挡水来土掩,行,既然java实现的思路已经有了,我们就用C++再写一遍怎么了,谁让咱也是科班出身。
###找到核心C++实现
我们发现,是在这里执行的decode,然后也是调用了decodeWithState,然后将得到的结果返回给java。
仔细跟进去,发现逻辑差不多,只不过一个是用java,一个是用C++。
jbyte *yuvData = env->GetByteArrayElements(yuvData_, NULL);

    std::string codeResult = "";
    try {
        ......
		省略部分代码
        // Perform the decoding.
        MultiFormatReader reader;
        reader.setHints(hints);
        Ref<Result> result(reader.decodeWithState(image));

        // Output the result.
        codeResult = result->getText()->getText();
        cout << result->getText()->getText() << endl;
    } catch (zxing::Exception& e) {
        cerr << "Error: " << e.what() << endl;
    }

    env->ReleaseByteArrayElements(yuvData_, yuvData, 0);

    return env->NewStringUTF(codeResult.c_str());
###QRCodeReader.cpp核心实现
下面就是decode使用c++的核心实现,因为前面已经讲过了Java的实现,所以这里找到C++的代码也是非常容易的
这里我们看到,有一句
Ref<DetectorResult> detectorResult(detector.detect(hints));
它的意思就是通过detect得到了detectorResult,然后通过下面的,
ArrayRef< Ref<ResultPoint> > points (detectorResult->getPoints());
得到了points,即定位点;
一开始我想着把这个定位点独立出一个方法,然后再通过回调的形式传递给Java层,这样做的好处就是我们可以通过Java来实现放大功能。但是因为我们相机预览的速度是特别快的,所以这样做其实并不合适。于是,把相机的参数传递进去,然后在C++里面完成对于相机的放大。
QRCodeReader::QRCodeReader() :decoder_() {
		}
		//TODO: see if any of the other files in the qrcode tree need tryHarder
		Ref<Result> QRCodeReader::decode(Ref<BinaryBitmap> image, DecodeHints hints) {
			Detector detector(image->getBlackMatrix());
			Ref<DetectorResult> detectorResult(detector.detect(hints));
			ArrayRef< Ref<ResultPoint> > points (detectorResult->getPoints());
			Ref<DecoderResult> decoderResult(decoder_.decode(detectorResult->getBits()));
			Ref<Result> result(
							   new Result(decoderResult->getText(), decoderResult->getRawBytes(), points, BarcodeFormat::QR_CODE));
			return result;
		}
###传递Java的Camera对象
主要是在原来的基础上多传递了扫描框的位置和Camera这个对象:
	xxx_QbarNative_decode(JNIEnv *env, jobject instance, jbyteArray bytes_, jint width,
										  jint height, jint cropLeft, jint cropRight, jint cropTop,
										  jint cropWidth, jint cropHeight, jboolean reverseHorizontal,
										  jobject camera, jobject parameters)
###放大代码使用C++实现
最后,根据参数进行实现:简单的说就是判断二维码定位点的距离,然后用这个距离和相框之间的距离做个比对,小于一半,我们递增。
	//执行检测逻辑,检测得到执行放大照相机逻辑,否则执行解析逻辑
	if(NULL != resultPoints && !(resultPoints->empty())){
		//省去部分核心代码

		if(isZoomSupported){
		//这里做了简化,主要解决放大倍数过多,使得二维码突然不在扫描框里。
			if (len <= frameWidth / 2){
				if(zoom < maxZoom){
					zoom = zoom + 8;
				}else{
					zoom = maxZoom;
				}
				jmethodID setZoomMth = env->GetMethodID(parametersCls, "setZoom", "(I)V");
				env->CallVoidMethod(parameters, setZoomMth, zoom);

				jmethodID setParametersMth = env->GetMethodID(camearCls, "setParameters", "(Landroid/hardware/Camera$Parameters;)V");
				env->CallVoidMethod(camera, setParametersMth, parameters);

				env->ReleaseByteArrayElements(bytes_, yuvData, 0);
				string ss = strStream.str();
			}
		}
	}
###导出so,打入58APP
最后,在demo中运行一下,看看效果。

##心得
其实最终解决这个问题不难,重点在于发现问题,解决问题的过程学到了什么。